Introduction

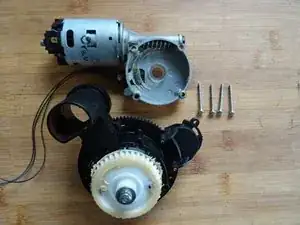
To repair the grinder, first open the device. Unscrew the grinder and lift it out. You can then open the grinder, clean it or replace parts (like the motor, sensor or the grinding discs).

  1. LQhtu2PhbWc6BqZF
    LQhtu2PhbWc6BqZF
    QU6YWb1F2LhhE5mk
    • Never forget: Unplug the power cord!

    • Remove all attachments, like the water reservoir, the brewing chamber, the bean compartment lid, and the drip tray. Remove all of the coffee beans.

    • Turn the machine around so the back is facing you. Remove the two T10 Torx screws at the bottom edge. Pull out the back at the bottom edge and lift it down.

    • It's important that the parts are readily visible:

    • The motherboard

    • The pump

    • The flow meter

    • The heating element

  2. OyPdcPsaKCWVufJo
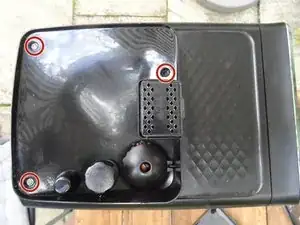
    • Unscrew the three T10 Torx screws in the coffee bean compartment.

  3. kpWcQWcW4dMExBHC
    kpWcQWcW4dMExBHC
    IjHejEMucFUZXeSA
    ItZfEKcQAcokDcHK
    • Remove all the beans from the opening on the finger guard of the grinder. A T10 Torx screw will become visible.

    • Unscrew the T10 Torx screw from the finger guard.

    • Lift the finger guard up.

  4. awdQV1LMNXFCT5uX
    awdQV1LMNXFCT5uX
    ammVgGP3saUkRnUB
    • Slightly lift the top cover up at the back edge.

    • When putting it back together, make sure the grinder control is sitting right.

  5. sJXMqvJsNmVL6rNu
    sJXMqvJsNmVL6rNu
    NCRdCytBkQk1x2Xp
    • Pull the upper cover out from under the front cover and lay it slightly offset.

    • Remove both of the T10 Torx screws attached to the side covers.

    • You can remove the top cover completely, especially if you must work on the grinder. But, if you want to see the machine functioning later, then lay it back in its original place.

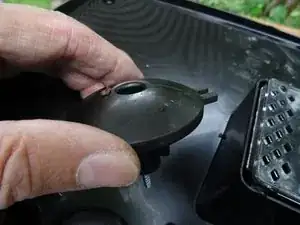
    • Picture 2 shows the grinder, which can now be easily taken off.

    • If you want to repair the grinder: here are the instructions Replacing the Philips ceramic grinder motor and sensor

  6. XOBCqiyIF6WBGVW1
    XOBCqiyIF6WBGVW1
    L5wdNnfXeMKR3f3y
    2tv1PIDrFUXqVgTM
    • Both side panels are still screwed to the lower edge of the front. Unscrew both of the T10 Torx screws out from here.

    • Slide both side panels back a bit, and take them out from the bottom edge.

    Hätten Sie einen Tipp, wie sich das Display/Frontpanel am besten lösen lässt? Da die Aufdrucke der weißen Bedienelemente bei uns zum Teil ausgeblichen sind (rein optischer Mangel), würden wir dieses gerne erneuern und austauschen.

    Lisa -

    @lisa65650 Habe ich bisher noch nicht machen müssen. Irgendwo sind Schrauben und Clips, man muss auf die Flachbandkabel achten. Allzu schwer kann das nicht sein. Vielleicht hilft dieses superlange Video. Gibt es das überhaupt als Ersatz?

    VauWeh -

    Um das Front Pendel demontieren zu können müssen zuerst der Deckel und beide Seitenwände demontiert werden. Anschließend muss der Verbindungschlauch zwischen Ausgabestelle und Brüheinheit getrennt werden. Es befinden sich oben am Panel 2 Torx10 Schrauben die dann heraus gedreht werden müssen. Anschließend müssen auf der rechten und linken Seite insgesamt 4 Kunststoffclips gelöst werde. Nun kann das Panel nach oben geschoben und etwas von der Maschine abgezogen werden. Große Vorsicht beim Lösen des Flachbandkabels - dies kann leicht beschädigt werden! Übrigens ist der Stecker nicht verriegelt sondern nur gesteckt. Wenn alle diese Schritte erfolgt sind muss die Ausgabestelle bei leicht abgezogenen Panel soweit nach unten geschoben werden, dass sie sich aus der Führungsschiene der Kaffeemaschine entnehmen lässt. Auf der Rückseite des nun demontiert Panels befindet sich eine rechteckige weiße Blende mit vier Clips. Hinter dieser Blende verbirgt sich die Platine.

    Sascha Selzer -

    @saschaselzer Vielen Dank für diese nützliche Information!

    VauWeh -

    Leider habe ich während der Reinigung die Torx T10-Schraube am Fingerschutz verloren und finde nun keine passende Ersatzschraube, um den Fingerschutz wieder zu befestigen. Der Kundenservice hat mir mitgeteilt, dass ich die gesamte Maschine zur Reparatur einschicken müsse – das erscheint mir jedoch völlig unverhältnismäßig, nur wegen einer kleinen fehlenden Schraube.

    Könntet ihr mir bitte weiterhelfen und mir sagen, um welche Schraube es sich handelt, damit ich eine passende Ersatzschraube besorgen kann?

    Vielen Dank für eure Unterstützung!

    Lyn -

    Hallo Lyn,

    die Schraube ist eine normale Torx T10 von 3,5x30 mm.

    Einige Modelle haben eine Hülse im Fingerschutz.

    (siehe Link)

    hülse

    Martin -

    Vielen Dank für die Schnelle Antwort. Mein Fingerschutz ist mit Hülse, passt dort auch die Torx T10 von 3,5x30 mm Schraube?

    Lyn -

    Hallo Lyn,

    Normalerweise sollte diese schraubengröße passen.

    Martin -

    Ich glaube eher, dass es eine T10 Maschinenschraube M4x16 ist. Vorsichtig, sonst geht das Gewinde kaputt. Hier sind alle Schrauben aufgelistet.

    VauWeh -

    Salve a tutti, secondo voi è possibile tarare il macina caffè? Nella posizione nr.1 (la più fine) non mi soddisfa vorrei che lo macinasse ancora più fine. E' possibile? Grazie anticipatamente.

    Salvatore Gioacchino La Greca -

    Drei der T10 sind schwarz - allerdings habe ich nicht mehr im Kopf von wo die waren, sind das die von hinten? Bzw. ist es egal ob man die schwarzen oder die silbernen nimmt, diese scheinen ja identisch zu sein?

    Michael Banck -

  7. SSIoL5AbsJWpQhtH
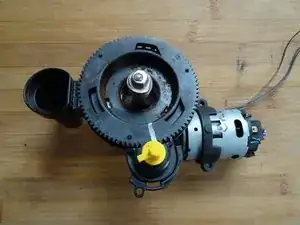
    • Take a photo of the mark on the large gear wheel; it should be in the same position when you reassemble it.

    • Although the motor is powered by 230 V, diodes ensure that only positive half-waves are supplied, so that the motor only rotates in one direction. Make a note of how the connection cables are plugged in. Test later to see if it is rotating in the correct direction.

    • You can test the motor with approximately 25 V DC. It should turn easily and draw approximately 120 mA. If this is not the case, check the carbon brushes on the side. Only then should you consider replacing it.

    • Insert translation here

    • Any brackets—in this case, the black rubber sleeve—must be transferred to the new part.

    • The speed sensor can only be removed from the inside. To do this, you must disconnect its plug from the main circuit board and expose the cables.

  8. bijtjJCEUy3TsQAD
    bijtjJCEUy3TsQAD
    qposXitNvYjZVBAU
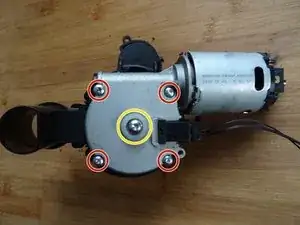
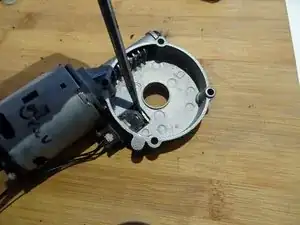
    • There are four Torx T10 screws on the underside of the grinding mechanism. Remove those.

    • The screw marked in yellow must not be removed when replacing the motor.

    • The white plastic sleeve around the screw marked in yellow must be transferred to the replacement part.

    • Lift off the motor.

    Hallo,

    unsere komplette Kaffeemaschine war innen voller gemahlenem, trockenen Kaffee.

    Beim Ausbau des Mahlwerkes ist mir aufgefallen, dass das Auslass-Stück vom Mahlwerk abgebrochen sein muss. (Rohr, durch das auch von oben auch loser Kaffee eingefüllt werden kann)

    Die Koppelfläche am Mahlwerk sieht intakt aus. Nur der Anschluss am Rohr zeigt Bruchflächen.

    Gibt's es das kleine Kunststoffteil als Ersatzteil?

    Vielen Dank für die gute Anleitung und die Hilfe!

    Fabian Nendel -

    Ja, das sollte der Pulverschacht sein. Kostet um 5€.

    VauWeh -

  9. q36e2VIEVE6xge4g
    q36e2VIEVE6xge4g
    KDCkNJAIgGTnJKQG
    kBpUOptqVbf1IPHh
    • The machine's electronic use the sensor to measure the number of revolutions. The sensor must be transferred to the new motor.

    • The sensor is secured on the inside with a locking tab. It can therefore only be removed from the inside.

    • Press the locking tab firmly down with a flat screwdriver.

    • Slide the sensor out, using the flat screwdriver to help if needed.

    • Transfer the sensor to the new part.

  10. 6yxIpRjbBTONbogU
    • Grease the worm gear on the new motor a little; the old grease may be sufficient, but new grease is better.

    • Check that the plastic bushing is seated properly in the center opening. Screw the motor tight.

Conclusion

Follow the steps in reverse order to reassemble your device.

VauWeh

Member since: 19/10/15

299149 Reputation

One comment

SAECO SM 7685 xelsis . Maalproces wordt bij electronische inschakeling direct gestopt . Error 1 soms 2 .

Maalwerk uitgenomen en super schoon . Niet aangetroffen de stekker verbinding toeren sensor , draden zitten er gewoon niet .

Durf bij u geen nieuw maalmechaniek te bestellen. U hebt het wel .

Printplaat in gebreke ?? Graag reactie , dankuwel. a.judinavanvuuren67@kpnmail.nl. ( a punt judina….. )

Janny van der Plas -